
| Limited Bandwidth Sharing |
 Instead of giving your neighbours free access to all of your bandwidth, installing a proxy server means you can limit them to as much or as
little bandwidth as you want. You also prevent them hogging all your connection with P2P downloads.
Instead of giving your neighbours free access to all of your bandwidth, installing a proxy server means you can limit them to as much or as
little bandwidth as you want. You also prevent them hogging all your connection with P2P downloads.
The open source proxy server Squid allows you to control how much, when, and who can share your internet connection, and runs on both linux and windows!
- Geting and installing the software
- Setup sharing
- Controlling bandwidth
It will be much easier if you have a working network before you embark setting up a proxy server. Remember google is your friend, and there are a lot of good resources on the net to help you set up a network. I may add some network guides later, but for now, only attempt setting up a proxy server once you already have a working network.
Getting and installing the software
Squid was not originally designed for windows, but a number of folk have ported it, so there are now windows versions available. In order to control the bandwidth, we need a version that has a feature called delay pools, thankfully Guido Serassio maintains such a version for windows. You need to go to his Squid Downloads page, and download a copy of the latest Delay Pools build, usually at the bottom of the page.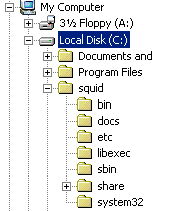 Once you have downloaded the zip file you need to extract the files (using winzip).
By default squid expects to be extracted to the root of the C drive (c:\) where it will create a directory called squid. For simplicity it is easiest to initially use this location, as you will need to change some settings if you want to install it elsewhere.
Because squid was not originally designed for windows, there is no fancy setup program to run, instead, we can change settings by editing the configuration file, and run the program from the command line.
Once you have downloaded the zip file you need to extract the files (using winzip).
By default squid expects to be extracted to the root of the C drive (c:\) where it will create a directory called squid. For simplicity it is easiest to initially use this location, as you will need to change some settings if you want to install it elsewhere.
Because squid was not originally designed for windows, there is no fancy setup program to run, instead, we can change settings by editing the configuration file, and run the program from the command line.
First up, we need to copy the example configuration files ( c:\squid\etc\squid.conf.default and c:\squid\etc\mime.conf.default ) with copy and paste, calling the new files squid.conf and mime.conf respectively while keeping them in the c:\squid\etc folder. By keeping a copy of the example configuration, we can always go back if we make any mistakes.
Open the new squid.conf file in notepad (using open with... from explorer). We need to change some settings before squid will run. Scroll down to the dns_nameservers section (you can get there quickly by searching for the text using Edit -> Find ) . We need to add a line for your isp's dns servers, so that squid can start before you have connected to the internet. You may need to visit your isp's we site to find these, or from a dos prompt type ipconfig /all while connected to the internet, and copy the values for the dns entries into your squid.conf file.
#  TAG: dns_nameservers
#	Use this if you want to specify
#       a list of DNS name servers (IP addresses)
#       to use instead of those given in your
#	/etc/resolv.conf file.
#
#	Example: dns_nameservers 10.0.0.1 192.172.0.4
#
#Default:
# none
dns_nameservers 158.152.1.65 158.152.1.193
Now scroll down to the "INSERT YOUR OWN RULE" section and add a line for your local network. If your computers interal address starts with 192.168 then add 192.168.0.0/16, otherwise if your internal address starts with 10. then add 10.0.0.0/8 . To find your internal address, us ipconfig at a dos prompt.
# INSERT YOUR OWN RULE(S) HERE TO ALLOW ACCESS
				 FROM YOUR CLIENTS

# Example rule allowing access from your local networks.
# Adapt to list your (internal) IP networks from
# where browsing should be allowed
#acl our_networks src 192.168.1.0/24 192.168.2.0/24
#http_access allow our_networks
acl our_networks src 192.168.0.0/16
http_access allow our_networks
Now scroll down to the "visible_hostname" section and add a line for your computer such as home.mynetwork
#  TAG: visible_hostname
#	If you want to present a special hostname ...
#	then define this.  Otherwise, the return ...
#	will be used. If you have multiple caches ...
#	get errors about IP-forwarding you must ...
#	names with this setting.
#
#Default:
# none
visible_hostname home.localnet
Next we need to create a folder for squid to keep its log files in. Firstly inside the squid folder, create a folder called var, then inside the var folder create a folder called logs. Finally before we can run squid, we need to get it to create it's cache files, From the start menu click run, and type c:\squid\sbin\squid -D -z. It will take a few seconds for it to create the directories.
Squid is now ready for a test run. There is still a lot of tweaking of settings etc, still to do, but it should be ready to start. From either a dos prompt or the start->Run dialog type c:\squid\sbin\squid -D. A blank prompt (or window) should appear, if it doesn't stay, then something is probably wrong, so try running c:\squid\sbin\squid -D -d 1 from a dos prompt, so it gives you some debug information as to what is wrong. Alternatively look in the log file c:\squid\var\logs\cache.log to see if there are any error messages. Press Ctrl C to stop the program for now, as now that it is installed ok , we are ready to set it up for sharing.
If you are running windows XP , Windows 2000, or Windows NT, you can configure squid to start automatically by installing it as a service. From either a dos prompt or the Run dialog type the following commands c:\squid\sbin\squid -i to install it, and c:\squid\sbin\squid -O -D to configure it (NB thats a capital o not a zero). Once installed as a service use net start squidnt and net stop squidnt to start and stop the service manually. It will start automatically netxt time you reboot.
Geting and installing the software >> Setup sharing
| Bandwidth control | |
| Hi, First of all i would like to appriciate your work but i have a question that how do u limit bandwidth your non http trafic such as kaza, p2p sharing programs because program like this does not use your squid or http trafic, these programs uses udp or different tcp ports. Thank you for your support for SquidNt users. | |
| Posted 25 May 2005 by ZeeShan | |
| Re: Bandwidth Control | |
| For non-web traffic you can use software such as Netlimiter or Bandwidth Controller for Windows. For linux there is built-in traffic shaping already. | |
| Posted 31 Oct 2006 by Roberto | |
